Earlier in this chapter you learned a great deal about triggering pipelines. You can trigger pipelines manually, or you can create numerous different Azure Synapse Analytics trigger types that run your pipeline for specific circumstances. Getting some details and an overview of the triggers you have in your workspace would be helpful. Knowing what you have is the minimum amount of information required to effectively manage them. You can find a list of all your triggers in the Manage hub by selecting Triggers from the navigation menu. The information there is informative, but you can also create a report using the Azure CLI. Running the following syntax from a PowerShell or command window results in the output shown in Figure 6.61:
$triggerQuery = “[].{Name: name, Type: properties.type, StartTime: ” + `
“properties.recurrence.startTime, Frequency: ” + `
“properties.frequency, State: properties.runtimeState, ” + `
” Scope: properties.scope}”
az synapse trigger list –workspace-name “csharpguitar-synapse” `
–query $triggerQuery -o table
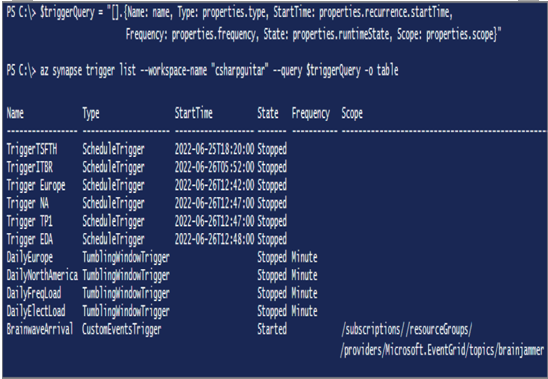
FIGURE 6.61 Managing batches and pipelines’ triggers
The result from the Azure CLI provides a bit more detail than you see in the browser. The Azure CLI provides all the details for all the configurations of all features in the workspace. You simply need to write the proper syntax to report out the information you want and need.
Schedule Data Pipelines
Scheduling pipelines that contain batch jobs, and scheduling pipelines in general, has been the overriding theme of this chapter. Refer to Table 6.4 for a brief description of all the different types of triggers available for a pipeline. You can use a scheduled trigger to specify a start date, a recurrence, and an end date. The “Create Data Pipelines” section includes significant information about scheduling triggers. For example, you created a scheduled trigger to run a pipeline in Exercise 6.7. Additionally, Figures 6.33, Figure 6.34, and Figure 6.35 illustrate what the different kinds of scheduled triggers look like while being configured. Finally, in Exercise 6.8, you scheduled a workflow job in Azure Databricks, with Figures 6.41 and 6.42 illustrating the experience. After reading this chapter, you should understand how to trigger pipelines and batch jobs.
Validate Batch Loads
As your pipeline progresses through the multitude of activities existing within it, it might be prudent to validate the data after each step, but it also might be unnecessary to validate after each and every step. Therefore, it is up to you to determine if validation is necessary based on what the activity does and how critical it is. You can use the following activities to validate data consistency during a pipeline run:
- Copy Data
- Validation
- Lookup
- Get Metadata
The behavior of each activity is focused on a similar data aspect: checking and validating the properties of the data that is about to be ingested or transformed—for example, whether the data or file exists, what the size is, what the name is, and where the file is located. All these aspects can be validated based on what you expect the outcome of upstream activities to be or what you believe is the proper structure of the data both before and after a pipeline or an activity is executed. Remember that in this context you are not concerned about missing, late, duplicated, or corrupted data. All the methods required to manage those scenarios have already been covered and require other approaches for correction. In this case, again, the focus is on making sure the incoming and outgoing data that is flowing through the pipeline is in the format, structure, and location that match your expected thresholds.